
Mixer Grinder Maintenance Tips: The Ultimate Care Guide for Your Kitchen Appliance 2026
The mixer grinder is a powerhouse in any kitchen, effortlessly tackling tasks from grinding spices to blending smoothies. This indispensable kitchen appliance saves us time and effort daily. But like any hardworking machine, it needs proper care to function at its best and last for years. Neglecting its upkeep can lead to poor performance, strange noises, and even a complete breakdown. This is where a solid understanding of mixer grinder maintenance tips comes into play.
This comprehensive guide will walk you through everything you need to know. We will cover daily cleaning routines, deep cleaning methods, essential motor care, and simple servicing tasks you can do at home. By following this ultimate mixer grinder care guide, you can ensure your appliance remains efficient, safe, and reliable. Let’s dive into the practical steps that will extend your mixer grinder’s life and keep it performing like new.
Why Mixer Grinder Maintenance is Non-Negotiable
Before we get into the “how,” let’s understand the “why.” Consistent maintenance isn’t just about cleanliness; it’s about performance, safety, and longevity. A well-cared-for mixer grinder is a cornerstone of effective kitchen appliance maintenance.
Enhanced Performance: Over time, food particles can build up on the blades, in the jars, and around the motor housing. This residue can make the blades dull and force the motor to work harder, leading to less efficient grinding and blending. Regular cleaning ensures every component works as intended, giving you perfectly ground masalas and smooth purees every time.
Improved Longevity: A mixer grinder is an investment. Simple care routines can significantly extend mixer grinder life, saving you money in the long run. By preventing rust, keeping the motor cool, and ensuring all parts are in good condition, you avoid premature wear and tear.
Safety First: A poorly maintained appliance can be a safety hazard. Frayed cords, loose blades, or a motor overheating from strain can lead to electrical issues or accidents. Following proper mixer grinder maintenance tips ensures the appliance operates safely, protecting you and your family.
Better Hygiene: The kitchen is where we prepare our food, so hygiene is paramount. Jars and blades that are not cleaned properly can become breeding grounds for bacteria, which can contaminate your food. Thorough mixer grinder cleaning tips are essential for food safety.
The Foundation: Daily and Weekly Cleaning Routines
The most effective maintenance starts with simple, consistent habits. These daily and weekly cleaning tasks are easy to incorporate into your kitchen routine and make a huge difference in the long-term health of your appliance.
After Every Use: The 2-Minute Clean-Up
This quick clean is the most crucial of all mixer grinder maintenance tips. It prevents food residue from drying and hardening, which makes it much harder to clean later.
- Immediate Rinse: As soon as you finish using a jar, empty its contents and immediately rinse it with plain water. This will wash away the bulk of the food particles.
- Soapy Swirl: Add a drop of liquid dish soap and a cup of warm water to the jar. Place it back on the motor base and run the mixer for about 30 seconds. This “self-cleaning” trick effectively cleans the blades and the inside of the jar with minimal effort.
- Final Rinse and Dry: After the soapy swirl, rinse the jar thoroughly under running water to remove all soap. Wipe the inside and outside with a clean, dry cloth. It’s vital to dry the jar completely, especially the blade assembly at the bottom, to prevent rust and mineral deposits.
- Wipe the Base: Take a damp cloth and wipe down the motor unit. Clean any spills or splatters immediately. Never immerse the motor base in water or hold it under a running tap.
Weekly Deep Cleaning: A Thorough Overhaul
Once a week, dedicate a little extra time to a more thorough cleaning session. This helps tackle any buildup you might have missed during the daily cleans.
- Disassemble the Jars: If your mixer grinder jars have removable blades, carefully unscrew the blade assembly from the bottom. This allows you to clean each part separately. Check your user manual for instructions on how to do this safely.
- Soak the Components: Place the jars, lids, and blades in a basin of warm, soapy water for about 15-20 minutes. This will help loosen any stubborn food particles stuck around the blade edges or under the gaskets.
- Scrub Gently: Use a soft-bristled cleaning brush or an old toothbrush to scrub the blades, jars, and lids. Pay special attention to the threads where the lid screws on and the area around the blade assembly, as these spots tend to accumulate grime.
- Tackle Stubborn Stains and Odors: For tough stains or lingering odors (like from grinding onions or garlic), create a paste of baking soda and water. Apply this paste to the inside of the jar and let it sit for about 30 minutes before scrubbing and rinsing. Alternatively, running the mixer with a solution of vinegar and water can also help neutralize strong smells.
- Clean the Gaskets: The rubber or silicone gaskets on the lids are crucial for preventing leaks. Remove them carefully and wash them in soapy water. Dry them completely before putting them back on the lids. A light application of cooking oil on the gasket can keep it supple and prevent it from drying out and cracking.
- Detail the Motor Base: Use a damp cloth and a mild cleaner to wipe the entire surface of the motor unit. Use a cotton swab or a soft brush to clean the crevices and the vents. Ensure the vents are clear of dust, as they are essential for motor cooling. This is a key part of mixer grinder motor maintenance.
By following these mixer grinder cleaning tips, you establish a strong foundation for a long-lasting appliance.
Advanced Maintenance: Mixer Grinder Motor Maintenance and Servicing
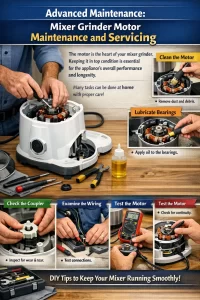
The motor is the heart of your mixer grinder. Keeping it in top condition is essential for the appliance’s overall performance and longevity. While some issues require professional help, many mixer grinder servicing tips can be handled at home.
Understanding and Protecting the Motor
The motor does all the heavy lifting, and its biggest enemies are overheating and overload. Proper usage is the first line of defense.
- Avoid Overloading: Never fill the jar more than two-thirds full, or halfway for solid ingredients. Overloading puts immense strain on the motor, causing it to heat up and potentially burn out. Grind or blend in smaller batches if necessary.
- Give it a Break: Most domestic mixer grinders are not designed for continuous long runs. Run the appliance in short bursts of 30-60 seconds, with small pauses in between. If you are grinding tough ingredients like turmeric or lentils, allow the motor to cool down for a minute or two after every couple of minutes of operation. This is one of the most important mixer grinder performance tips.
- Heed the Overload Protection Switch: Nearly all modern mixer grinders have a red or black reset button at the bottom of the base unit. This is the overload protection switch. If the mixer stops suddenly during operation, it’s likely because the motor was overloaded or overheated, and this switch tripped to prevent damage. Turn the mixer off, unplug it, reduce the load in the jar, wait a few minutes for the motor to cool, and then press this reset button before trying again. Never ignore this warning sign.
- Ensure Proper Ventilation: The motor needs airflow to stay cool. Make sure the air vents on the motor housing are not blocked. Don’t operate the mixer grinder on a cloth or surface that could obstruct these vents. Always place it on a flat, stable, and clear countertop.
DIY Servicing and Checks
Performing occasional checks can help you catch small problems before they become big ones. These mixer grinder servicing tips are easy for anyone to follow.
Checking the Coupler
The coupler is the small, star-shaped plastic or rubber component on top of the motor base that connects with the gear on the bottom of the jar. It’s designed to wear out over time to protect the motor from excessive torque.
- Inspection: Periodically check the coupler for signs of wear, such as flattened or chipped teeth. A worn coupler can cause a lot of noise and inefficient power transfer to the blades.
- Replacement: Replacing a coupler is often a simple DIY task. You can typically unscrew the old one (some have reverse threads, so you might need to turn it clockwise to loosen) and screw on a new one. Replacement couplers are readily available online or at appliance repair shops. Check your manual for the correct procedure.
Inspecting the Jar and Blade Assembly
- Blade Sharpness: While mixer grinder blades work more by impact at high speeds than by sharpness, check them for any nicks or bends. If you notice a significant drop in grinding performance, the blades might need replacing.
- Leaky Jars: If a jar starts leaking from the bottom, the issue is likely a worn-out washer or bush in the blade assembly. These are small, inexpensive parts that can often be replaced at home, saving you the cost of a new jar.
Carbon Brush Inspection (For Advanced Users)
The motor’s carbon brushes conduct electricity to the spinning part of the motor. Over years of use, they wear down. Signs of worn brushes include sparking from the motor vents, a loss of power, or the motor failing to start. Replacing them is a more advanced repair that may be best left to a professional, but it’s a key aspect of deep motor maintenance that can save an old mixer grinder.
Specific Care for Different Mixer Grinder Types

While many maintenance principles are universal, some types of mixer grinders require special attention.
Also, Read: The Ultimate Guide to the Best Mixer Grinder Company in India (2026)
Heavy Duty and Commercial Mixer Grinder Maintenance
Commercial and heavy-duty models are built to withstand more rigorous use, but they also demand diligent care to justify their higher cost and ensure consistent performance in a professional setting.
- More Frequent Deep Cleans: In a commercial kitchen, the weekly deep clean should become a daily end-of-day routine. Disassembling and thoroughly sanitizing jars is crucial for health and safety standards.
- Regular Professional Servicing: Commercial mixer grinder maintenance should include scheduled professional servicing. A technician can check the motor, bearings, and wiring to ensure everything is in perfect working order and replace parts before they fail.
- Monitor Motor Temperature: These machines often run for longer periods. Be mindful of the motor housing’s temperature. If it feels excessively hot, let it cool down completely. Proper ventilation is even more critical for these powerful motors.
- Heavy Duty Mixer Grinder Care: These models often grind very tough ingredients. After grinding hard spices or grains, always check the blades for any signs of stress or damage. Ensure the coupler is not excessively worn. The robust nature of these machines doesn’t make them invincible; it just means they have a higher tolerance that shouldn’t be constantly tested.
Standard Domestic Mixer Grinders
For the models found in most homes, the key is consistency. The daily and weekly routines mentioned earlier are the core of your mixer grinder care guide. Don’t push the machine beyond its limits. Use it for its intended purpose and respect its duty cycle to extend mixer grinder life significantly.
Troubleshooting Common Mixer Grinder Problems
Even with the best care, you might occasionally run into issues. Here are some common problems and their solutions, incorporating our key mixer grinder maintenance tips.
Problem: The mixer grinder won’t start.
- Solution 1 (Power): Check if the plug is securely in the socket and the switch is on. Test the socket with another appliance to ensure it’s working.
- Solution 2 (Overload): The overload protection switch may have tripped. Unplug the unit, wait 3-5 minutes, press the reset button on the bottom, and try again.
- Solution 3 (Jar Seating): Some models have a safety lock that prevents the motor from starting if the jar is not seated correctly. Remove the jar and place it back firmly.
- Solution 4 (Worn Brushes): If the mixer is old and has seen heavy use, the motor’s carbon brushes may be worn out. This usually requires professional repair.
Problem: The mixer is making excessive noise or vibrating.
- Solution 1 (Uneven Load): The contents in the jar might be unevenly distributed or too lumpy. Stop the mixer, redistribute the contents, and restart.
- Solution 2 (Unstable Surface): Ensure the mixer is on a flat, stable surface. The rubber feet on the bottom should be clean and provide a firm grip.
- Solution 3 (Worn Coupler): A loud, grinding noise often points to a worn-out coupler on the motor or the jar. Inspect both and replace if they appear damaged.
- Solution 4 (Loose Blades): Check if the blade assembly in the jar is tight. If it’s loose, it can cause rattling and vibration.
Problem: There’s a burning smell coming from the motor.
- Solution 1 (New Appliance): A slight burning smell is normal during the first few uses of a brand-new mixer grinder. This is the varnish on the motor windings curing and should disappear after a few uses.
- Solution 2 (Overheating): If this happens with an older appliance, stop it immediately and unplug it. You have likely been running it for too long or have overloaded it. Let it cool down completely for at least 30 minutes. This is a critical warning sign that you need to adjust your usage habits.
- Solution 3 (Food Spillage): Spilled liquids or food particles could have entered the motor housing and are burning on the hot motor. This highlights the importance of keeping the base unit clean.
Problem: The jar is leaking from the bottom.
- Solution 1 (Loose Blade Assembly): The blade unit at the bottom of the jar might be loose. Try tightening it by hand.
- Solution 2 (Worn Gasket/Washer): The small rubber washer within the blade assembly is likely worn out or broken. You can buy a replacement kit and change it yourself. This is a very common and easily fixable issue.
A Complete Mixer Grinder Care Guide: Summary of Best Practices
To make it easy, here is a consolidated checklist of the most vital mixer grinder maintenance tips to follow.
Daily:
- Rinse jar immediately after use.
- Perform a “soapy swirl” by running the jar with soap and water.
- Rinse and dry all parts thoroughly.
- Wipe down the motor base.
Weekly:
- Soak and scrub jars, lids, and blades.
- Use baking soda or vinegar to remove stains and odors.
- Clean lid gaskets.
- Use a brush or swab to clean motor vents and crevices.
Monthly:
- Inspect the motor coupler and jar coupler for wear.
- Check the blade assembly for tightness and the washers for leaks.
- Inspect the power cord for any signs of fraying or damage.
General Usage Habits:
- Never overload the jars.
- Run the mixer in short intervals with pauses.
- Pay attention to the overload protection switch.
- Ensure the appliance is on a flat, stable surface with clear ventilation.
- Always add enough liquid when blending to create a smooth vortex, which reduces strain on the motor.
Following these practices is the secret to getting the most out of your appliance. It’s not about one-time fixes; it’s about building a routine of care. These are not just mixer grinder maintenance tips; they are habits that ensure your kitchen runs smoothly.
Extending Mixer Grinder Life: The Ultimate Goal
Every tip and technique discussed in this guide has one common goal: to extend mixer grinder life. A mixer grinder can easily last for a decade or more with proper care, even with regular use. The difference between an appliance that lasts two years and one that lasts ten often comes down to maintenance.
Think of it this way: you are not just maintaining a machine; you are preserving an investment and a valuable kitchen partner. The few minutes you spend on cleaning and inspection after each use save you hours of frustration and hundreds of dollars in repair or replacement costs down the line. This comprehensive approach to kitchen appliance maintenance will pay dividends in performance, reliability, and peace of mind.
From simple mixer grinder cleaning tips to more involved mixer grinder motor maintenance, you are now equipped with the knowledge to care for your appliance like a pro. Embrace these routines, and your mixer grinder will reward you with perfect results for many years to come.
Also, Read: Mixer Grinder RPM: The Hidden Secret to Perfect Grinding
Frequently Asked Questions
What is the best way to deep clean a mixer grinder weekly?
Once a week:
- Soak jars, lids, and removable parts in warm soapy water (15–20 min)
- Scrub threads, lid grooves, and blade area with a soft brush
- For odor/stains: use baking soda paste (30 min) or vinegar-water run
Clean and dry the rubber gasket properly before refitting
How do I remove onion/garlic smell from mixer grinder jars?
Use any one:
- Run vinegar + water for 20 seconds, rinse and dry.
- Or scrub with baking soda paste and leave 20–30 minutes
Tip: Dry the jar open for a while; trapped moisture keeps odor.
How can I prevent rust in mixer grinder blades and jar base?
Rust prevention = drying + storage:
- Always dry the jar upside down
- Don’t store the jar closed when wet
- After washing, wipe the blade assembly area carefully If you live in a humid area, keep jars in an airy space.
How do I protect the mixer grinder motor from overheating?
Follow safe usage habits:
- Don’t overload (max 2/3 jar, solids often 1/2)
- Run in 30–60 second bursts, rest 10–30 seconds
- Keep vents clear and place on a hard, flat surface If the motor feels too hot, stop and cool 15–30 minutes.
What does the overload protection (reset) button do, and when should I press it?
If the mixer stops suddenly, overload protection may have tripped:
- Switch OFF and unplug
- Reduce load inside jar
- Wait 3–5 minutes
- Press the reset button under the base If it trips repeatedly, you’re overloading or the motor is overheating.
Why is my mixer grinder making loud noises or vibrating?
Most common reasons:
- Uneven load or hard lumps → redistribute contents
- Worn coupler → replace coupler (motor/jar coupling)
- Loose blade unit → tighten blade assembly
- Unstable counter / dirty rubber feet → clean and stabilize, If noise is new + harsh, stop and inspect coupler/blades immediately.
What is a mixer grinder coupler, and how do I know it needs replacement?
The coupler is the small star-shaped part that transfers motor power to the jar.
Replace it if you see:
- Flattened/chipped teeth.
- Slipping, jerky rotation, or loud grinding sound. Couplers are inexpensive and often DIY replaceable (some have reverse threads).
Why is my mixer grinder jar leaking from the bottom?
Usually due to:
- Loose blade assembly → tighten it
- Worn washer/bush/gasket inside blade unit → replace the seal kit Don’t ignore leaks—liquid can reach the coupling area and create bigger issues.
What does a burning smell from a mixer grinder mean?
It depends:
- New mixer: mild smell can be normal for first few uses
- Old/used mixer: usually overheating or overload
Action: - Stop immediately, unplug
- Cool down 30 minutes
- Reduce load + use short bursts If smell persists or you see sparks, get professional servicing (brush/wiring check).